How to Replace a Sprinkler Head a Step by Step DIY Guide
A lush, green lawn is the pride of any homeowner, but a faulty sprinkler system can quickly turn that dream into a patchy, water-logged nightmare. Whether you’re dealing with a geyser shooting water into the air, a sad dribble where a healthy spray should be, or a tell-tale puddle forming around a sprinkler, a broken head is often the culprit.
That constant leak or off-target spray isn't just an eyesore; it's a major source of water waste. According to the U.S. Environmental Protection Agency, a single broken sprinkler head can waste as much as 25,000 gallons of water over a six-month irrigation season. That’s a lot of wasted water and a significant spike in your utility bill.
The good news? You don't have to be a professional landscaper to tackle this common problem. Replacing a sprinkler head is one of the most straightforward and rewarding DIY home maintenance tasks you can do. With a few simple tools and about 30 minutes, you can restore your irrigation system, save water, and get your lawn back on track.
In this guide, we'll walk you through everything you need to know, from identifying the type of sprinkler head you have to testing your handiwork. Let's get that sprinkler fixed!
Why You Should Replace a Broken Sprinkler Head Right Away
Procrastinating on this small fix can lead to bigger problems. Here’s why it’s worth your time to fix it now:
- Significant Water Savings: Fixing leaks stops the constant drain on your water supply, which is good for the environment and your wallet.
- A Healthier Lawn: A functioning system ensures even water distribution, preventing brown, dry spots from under-watering and root rot or fungus from over-watering.
- Prevents Property Damage: Puddles and constant moisture can erode soil, damage walkways, and even affect your home’s foundation over time.
- Cost-Effective: A replacement sprinkler head is inexpensive, and doing it yourself saves you the cost of a professional service call.
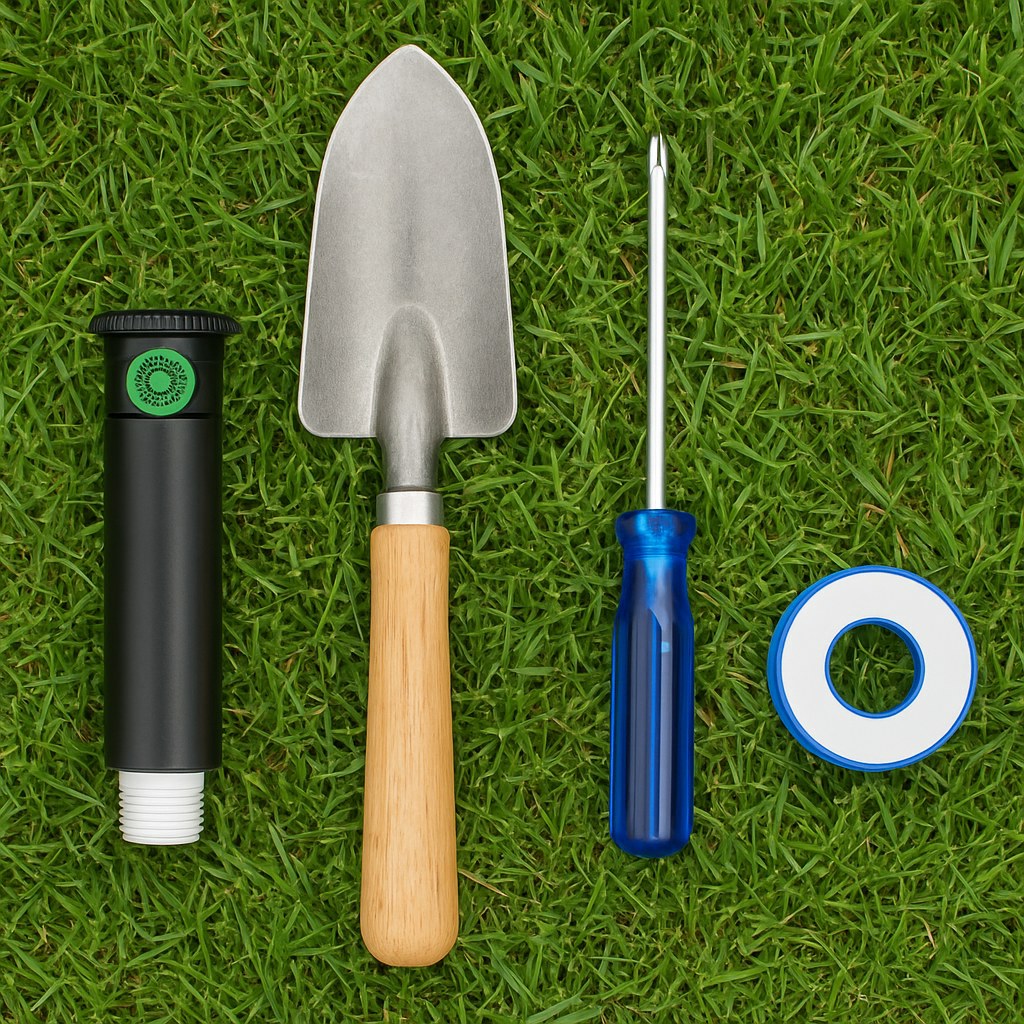
Step 1: Identify Your Sprinkler Head and Get the Right Replacement
Before you start digging, you need to know what you’re working with. Sprinkler heads aren't one-size-fits-all. Taking a few minutes to identify your current model will make your trip to the hardware store much easier.
There are three main types of residential sprinkler heads:
- Pop-Up Spray Heads: These are the most common. The body is buried in the ground, and a small stem "pops up" when the water turns on, delivering a fixed, fan-like spray. They are ideal for smaller, standard-shaped lawn areas.
- Rotor Heads: These also pop up but rotate to spray a single stream of water over a larger area. They are used for medium to large lawns.
- Fixed (or Shrub) Heads: These are mounted on risers that sit above the ground, often in garden beds or shrubbery. They don't pop up or retract.
You also need to check how the head is attached to the water line. This is typically one of two ways:
- Threaded Connection: The sprinkler body screws directly onto a vertical pipe called a riser. This is the most common setup.
- Clamped Connection: The sprinkler body slips over a pipe stub and is held in place by a metal clamp tightened with a screw.
Pro-Tip: The easiest way to ensure you buy the right replacement is to dig up the old, broken head first and take it with you to the store. This guarantees a perfect match in size, type, and connection method.
Step 2: Prepare for the Replacement
Safety first! You don't want a face full of water when you remove the old head.
- Shut Off the Water: Find your irrigation controller (usually in the garage or basement) and turn off the specific zone that feeds the broken sprinkler. If you can't use the controller, find the valve box in your yard (a round or rectangular green lid flush with the ground) and turn the appropriate zone valve to the "off" position.
- Confirm the Water is Off: Walk back to the sprinkler head. If it was actively leaking, the flow should have stopped.
- Relieve Pressure: Wait a minute or two to let any remaining water pressure in the line dissipate.
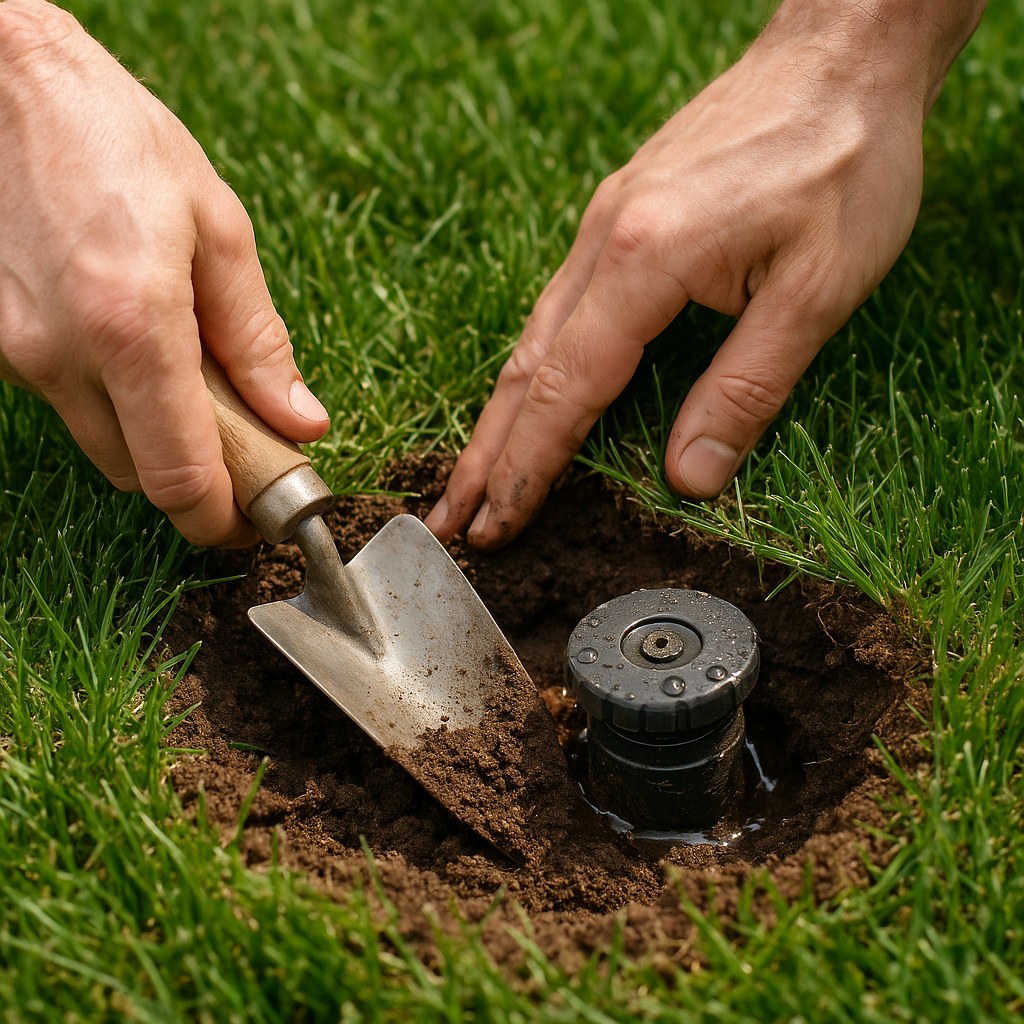
Step 3: Dig Out and Remove the Old Sprinkler Head
Now it’s time to get your hands dirty.
- Excavate Carefully: Use a small garden trowel to cut a circle in the turf about 6 inches out from the sprinkler head. Carefully lift this piece of sod and set it aside. This makes it easy to perfectly patch your lawn when you're done.
- Clear the Dirt: Dig out the soil around the sprinkler body until you have exposed the body and its connection to the riser pipe. Be gentle to avoid damaging the underground pipes. Brush any loose dirt away from the top of the sprinkler to prevent it from falling into the water line.
Now, let's remove the head based on its connection type.
For a Threaded Sprinkler Head:
Grip the sprinkler body firmly with your hand and turn it counter-clockwise (lefty-loosey). It should unscrew from the riser. Once it’s loose, lift it straight out.
For a Clamped Sprinkler Head:
Locate the metal clamp ring at the base of the sprinkler body. Use a flathead screwdriver to loosen the screw on the clamp. You don't need to remove the screw completely. Once loose, slide the clamp up and pull the sprinkler body straight off the riser stub.
Step 4: Inspect the Riser and Install the New Head
With the old head removed, take a moment to inspect the exposed riser (the pipe it was attached to). Check for any cracks, stripped threads, or wobbling. If the riser itself is damaged, you'll need to replace that as well, which can be a more involved job. If it looks damaged, it might be time to call a professional.
If the riser looks good, you're ready to install the new head.
Installing a Threaded Sprinkler Head:
- Clean the Riser: Use a brush or rag to wipe away any dirt from the inside of the riser to ensure a clean connection.
- Apply Teflon Tape: Wrap the threads of the riser with two layers of Teflon tape (also called plumber's tape). Be sure to wrap it in a clockwise direction. This helps create a watertight seal.
- Screw on the New Head: Hand-tighten the new sprinkler body onto the riser by turning it clockwise until it's snug. Don't over-tighten, as you might need to adjust its position later.
- Attach the Nozzle: If your new head came with the nozzle separate, screw it onto the pop-up stem.
Installing a Clamped Sprinkler Head:
- Clean the Riser Stub: Wipe any dirt off the riser stub.
- Slide on the New Head: Push the new sprinkler body firmly onto the riser stub.
- Secure the Clamp: Position the clamp ring over the joint where the head and pipe meet. Use your screwdriver to tighten the screw until the head is held firmly in place.
- Attach the Nozzle: Screw the nozzle onto the pop-up stem.
Step 5: Test, Adjust, and Finish Up
Before you fill the hole back in, let's make sure everything is working correctly.
- Test the System: Go back to your controller or valve box and turn the zone on for a few seconds. Watch the new sprinkler head. Check for any leaks around the base.
- Adjust the Spray Pattern: With the water running, adjust the new head to ensure it's watering your lawn and not the sidewalk or driveway.
- For pop-up spray heads, you can typically rotate the pop-up stem to aim the spray pattern.
- For rotor heads, you'll likely need a special key or a small screwdriver to adjust the arc (the rotation pattern) and the throw distance, per the manufacturer's instructions.
- Turn the Water Off: Once you're happy with the alignment, shut the zone off again.
- Backfill the Hole: Refill the hole around the sprinkler with the soil you removed. Make sure the top of the sprinkler head is flush with the soil level to avoid hitting it with the lawnmower.
- Replace the Turf: Place the piece of sod you saved back into place and tamp it down gently with your foot.
Give it a final test run to be sure everything is perfect. Congratulations, you’ve just replaced your first sprinkler head!
DIY vs. Hiring a Pro: What's the Cost?
One of the best parts of this project is the savings.
- DIY Cost: A new sprinkler head typically costs between $5 and $20, depending on the type. Add a few dollars for a roll of Teflon tape, and you're all in for less than $25.
- Professional Cost: Hiring a professional irrigation specialist for a single head replacement can cost anywhere from $75 to $150, according to sites like HomeAdvisor.
By investing a little bit of your time, you can save a significant amount of money.
When to Call for Backup
While this is a great DIY project, there are a few situations where it's best to call a professional:
- You can't locate the valve box or shut off the water to the zone.
- The riser pipe underneath the sprinkler head is cracked or broken.
- After replacing the head, you still have leaks or major pressure issues in that zone.
- The problem is with the underground pipes or the zone valve itself.
Don't let a small plumbing issue turn into a big one. Knowing when to call for help is just as important as knowing how to do it yourself.
For more expert home maintenance guides, troubleshooting tips, and easy access to trusted professionals when you need them, download the Casa app today! We’re here to help you manage and maintain your home with confidence.

